Destiny 2 | How to Get Outbreak Perfected

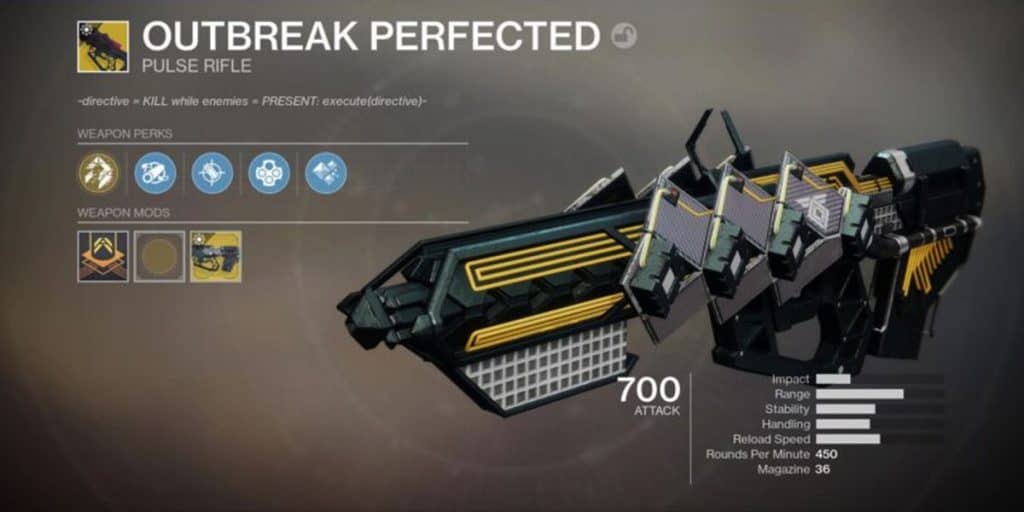
The Destiny 2 Outbreak Perfected is an exotic pulse rifle that was introduced in the Joker’s Wild in Destiny 2. It can be said that it’s the re-mastered version of the Outbreak Prime from the Rise of Iron in Destiny.
It is the third Exotic Pulse Rifle that was introduced in Destiny 2 apart from the other two – Vigilance Wing and Graviton Lance. Just like the Outbreak Prime, it is potentially a highly versatile multipurpose weapon granted that it is used by a player with a good enough aim. In PvE, it is safe to say that it can clear hordes of enemies like it’s a piece of cake. Dealing heavy blows to boss enemies when enough nanites attach to them is one of its core strengths.
There is no doubt that the Outbreak Perfect Destiny 2 is a must have, its high level of damage and multipurpose utilization is truly a sight to behold. So without further ado, read and find out for yourself how to get Outbreak Perfected for yourself. If you are searching for similar exotic weapons, have a look at our list of the exotics weapons and armor in Destiny 2.
How to Get Outbreak Perfected in 2022
The Zero Hour Mission is the quest completing which will get you the outbreak perfected pulse rifle. However, that is not the only way. It’s pretty easy to get it these days with a little bit of material hunting. You can buy the rifle from the Exotic Kiosk in the Monument to Lost Lights Tower next to the Vault similar to how you can buy the Anarchy. The rifle would cost you –
- 150,000 Glimmer
- 2 Ascendant Shards
- 250 Dusklight Shards
- 1 Exotic Cipher
You can find the Exotic Cipher by completing the quest from Xur who you will need to visit to get other weapons from the Shadowkeep as well. However, if you are willing to spend some cash, you can also get it from the Season Pass.
Glimmers on the other hand can be acquired from completing any activities. Strikes, gambit, crucible and pretty much any other activities will get you Glimmers.
The Ascendant Shards can be acquired from high-level nightfalls as random drops from the final chest. However, you can guarantee getting it by simply purchasing it from Banshee-44 who will also help you get kinetic mods. There’s a ton of different places to farm Dusklight Shards. Down below you’ll find one that is a personal favorite.
1. How to Farm Dusklight Shards
You could farm Dusklight shards by blindly roaming around the map and hope to find an area that holds tons of it. However, this method requires a lot of time and patience. It is almost unreasonable to not have a clear path in front. However, there are certain known routes that offer more Dusklight shards than others. Here is one that you could follow to collect a large amount of shards.
To find this route, you will want to go to the trust land area. Here, you will want to run around the outside walls of this district. If you do this you will start to see large amounts of shards. If you run this route, it is highly recommended to use a ghost shell with the treasure detection perk. By doing this, the amount of shards will be increased. There are about 15 different chests on this route that tend to spawn very quickly that will also produce shards. You will also encounter a few high value target bosses on this route that you can kill for even more shards and other loot.
If you are looking to maximize the amount of shards you are getting, it is highly recommended to grab the daily bounties from Devrim Kay. They are pretty simple and they offer Dusklight shards as rewards. You will be able to finish these bounties very quickly on this route. This is one way you can get Outbreak Perfected. Another way you can can get Outbreak Perfected is by completing the Zero Hour Mission. Continue reading to find out how to get Outbreak Perfected from the Zero Hour Mission.
2. Acquiring Outbreak Perfected From The Zero Hour Mission
The Zero Hour Mission is the Outbreak Perfected quest. To acquire this exotic pulse rifle from The Zero Hour Mission, we have to go through four stages of this quest. These being:
- Finding the Fallen Transponder
- Recovering the six nodes
- Deciphering the message
- Completion of the Mission
Each of these stages are simply described below for you to get your hands on this rifle ASAP.
Stage 1: Find the Fallen Transponder
Before starting this quest, remember the following.
- To open the door for this quest, you first need to complete the world quest by the name of “ENEMY OF MY ENEMY” on Titan.
- This world quest becomes available after the story/campaign is beaten.
- In the last part of this quest, you need to kill the Knight ‘GOLTHOR’ , remember, not the FALLEN CAPTAIN (Mithrax, the Forsaken).
Once the above conditions are met, you are ready to go for the Fallen Transponder. We have compiled the steps to acquiring it in a simple manner for you to find them.
Step 1: Now, you need to proceed to The Rig and then travel south towards the Tidal Anchor.
Step 2: Keep going until you come across a red room with two closed doors.
Step 3: Here, the door on the left side has a prompt reading “Unlocked”.
Step 4: Proceed through that door to find a red node right next to a table.
Step 5: Now, simply interact with the node. This will allow the player to obtain the Fallen Transponder.
Now, you have the Fallen Transponder and are ready to continue with the next task.
Stage 2: Recover Six Nodes From Six Sectors
Now, once the Fallen Transponder is acquired, it requires the player to find and collect a number of six nodes to further make progress with the quest. As for the location of the nodes, four of them can be found on planet Earth while the other two are located on planet Nessus.
All of the nodes are located in lost sectors and the first four nodes are located in the Lost Sectors of the European Dead Zone more commonly known as EDZ. These are where you will find the nodes.
1st Node: The location for the first node is in the Drain Lost Sector. You need to go to the end and kill the Metal Captain. Once done, you need to walk past the chest of that Lost Sector and continue moving until you find a giant cavern with Fallen flags on the ceiling. Now, jump and squeeze in until you find two boxes with purple sheets on them. In between these two boxes, you should find the first node.
2nd Node: Now for the second node, the location is the Whispered Falls Lost Sector. You need to jump into the pit and on your right you can find a nook with a green light glowing. You can find the second node there simply by wonder-ing on in.
3rd Node: Now to the Atrium Lost Sector we go for the third node. We simply walk down the stairs and continue with the path. Now, we take out the first room of fallen, walk through the door and turn hard left. Here, you will find a small alcove which will have the third node behind a pillar.
4th Node: The last node on Earth is in the Widow’s Walk Lost Sector. Clear all the enemies there and head past the chest. Now, go up and on the right, you will find a small landing inside a broken building. You will find the fourth node by jumping in.
5th Node: Now we’re done with Earth so on to Nessus. Simply complete the Carrion Pit Lost Sector and then walk past the chest. Now if you look to your right, jump down as far as possible and then turn back around, you will find a hidden wall. Now jump back up behind this wall and you’ll be able to find the 5th node.
6th and Last Node: Now for the last node, head on to The Rift Lost Sector and find the big red light in the center of the Lost Sector area. From there, you will need to look to the left of the chest where you will find a storage container that is hanging off a ledge. That container is the location of the node. In order to get there, you need to run up to the platform and jump until you get to the open side. Now you have acquired the sixth node.
Stage 3: Decipher The Message
Now to decipher the message appearing in the Fallen Transponder after collecting all the nodes follow these steps.
Step 1: Head to the Farm and once you land in the social space, head to the right where you will find a large barn with an open cellar.
Step 2: Now simply walk down the stairs and continue the path until you find Mithrax, the Forsaken who is the Fallen Captain. He is the one who was spared in the “ENEMY OF MY ENEMY” quest.
Step 3: Now, do not interact with Mithrax as it will start the final mission. Gather your fire team and make sure you’re all over 690 light.
Step 4: Once all the conditions are matched, you are good to go.
Stage 4: Complete The Zero Hour Mission
Now for the last level, you’ll be given 20 minutes, so follow through the steps to complete it in a jiffy. Now, before you start, make sure you have Arc, Solar and Void damage covered on your team. This will simplify the mission. Now, we are ready.
Step 1: Now the first area is a combat area in which you have to fight your way through the enemies.
Step 2: Next will be the platform section. Once you reach ‘The Passage’ location, jump down and go under the ship to your left. This is a vent travel level.
Step 3: Simply go through the ventilation shaft, but after breaking the second vent, head to your first right and jump down to the next platform.
Step 4: After making your way outside, you will find a big yellow crate. From here on out there is a massive skip to save you time and effort.
Step 5: Jump and then hug the wall and then use your jump again to get onto a ledge that will appear in front of you.
Step 6: Once you reach a giant chasm, simply jump to the end. That is where you will find an exit on the bottom right. (Note: Hit a switch that is available there to make the platform easy for your teammates.)
Once you have come this far, you are only two steps away from completion. Complete the puzzle and then kill the FINAL BOSS. However, these 2 steps are not fully simple as there are a few things to keep in mind.
Step 1: Do not engage with the killer robot called Trevor when you get to the puzzle. He will kill you simply by touching you. The task is to hit the four switches of the box-like maze with the help of your teammates all the while avoiding Trevor.
Step 2: Once done with the puzzle, you will reach The Vault where the final boss lies. Be wary of his moves and observe his attack patterns. Formulate a counter attack and you will be able to beat him.
Finally as you destroy everything, you will finally receive the incredible Outbreak Perfected Pulse Rifle as a reward.
Conclusion
This is how to get Outbreak Perfected in Destiny 2. Simply following these steps will show you how to get Outbreak Perfected. Hopefully, all the minor details were covered and a clear view of the objective was presented through this article without it being too boring and complex. The Outbreak Perfected is indeed a legendary rifle amongst the Destiny community and now with this, you have it in your hands.


