Cyberpunk 2077 Crashing on Startup after Patch 1.5

Cyberpunk 2077 is easily the most anticipated game of the year 2020. It is an action role-playing video game published by CD Projekt and developed using REDengine 4, a team of members responsible for bringing us Witcher 3: Wild Hunt. The game was first announced in E3 2018 and again in E3 2019, where Keanu Reeves AKA Johnny did the panel for it in the latter as he has lent his voice and face to one of the characters.
When the game was first released in 2020 and finally made available worldwide on Steam, the gaming industry went bonkers behind it.
However, gamers almost immediately started to complain during start-up or in-game missions. The game would abruptly crash and the error “Whoa! Cyberpunk 2077 has flatlined” would show. Others reported that their systems would automatically go into restart mode.
While this is not the first time that a game would cause your PC to restart or shutdown, it is a very annoying occurrence and may affect your system’s health. There a few steps that you can take to correct this issue. In the following, we will look at some of the common reasons of Cyberpunk 2077 crash on startup and steps one can take to correct these issues.
Causes Of Cyberpunk 2077 Crashing on Startup after 1.5 Patch
To correct a problem, one must first understand the nature of the said problem. If you don’t, then you might cause more harm than good. There are a few factors that come into play when talking about Cyberpunk 2077 crashing. Let’s look at some of these reasons.
- Mods: It is very common for PC gamers to install mods to enhance their gaming experience. Each update to the game changes the internal code, which means that the mods you were using for the previous version of the game need to be updated as well.
- Unmet Requirements: This is one of the common reasons why Cyberpunk keeps crashing on your PC. The games developed today function at a very high level. They are developed using advanced tech and engines to provide an elevated gaming experience. To run them, your system needs to match certain requirements like memory space, RAM, processor and graphic card. Without these, there is not much one can do.
- Power Settings: In the operating systems today one can adjust the power output. This is done to save power and prolong battery life. However, if your game requires high power output to run, then these settings will cause your game to crash and take your system with it.
- Overheating: Some games demand quite a bit from your system. They are known to consume resources at a pace that puts too much load on the PC. This causes your system temperature to rise past its threshold and cause a shutdown. Unless you have an expensive liquid cooling system, your system just can’t sustain such heat.
- System Failure: If any operating system file is corrupt on your PC then your system will shut down and won’t be able to restart. Every attempt to restart will keep bringing you back to the start-up screen.
- Bad PSU: PSU stands for the Power Supply Unit. It is responsible for providing the main power supply to the motherboard. In case your PSU is damaged or malfunctioning then an unseen power surge could shut-down your PC.
- Heatsink: This is a very important cooling component in today’s PC. It is responsible for keeping the CPU cool as it carries out its function. If your heatsink is functioning at its default setting, then it may not cool your CPU at the rate necessary when running a game.
- Overclocking: This component is generally responsible for an optimal and smooth run of your PC. However, it is prone to becoming unstable and this may cause errors such as Cyberpunk 2077 crashing on startup common.
- BIOS Setting: BIOS is responsible for managing data flow between software and hardware. Your BIOS may be set to run at its maximum efficiency. Though this sounds good, some games rather prefer that BIOS runs at its default mode.
- Bad GPU: GPU stands for Graphics Processing Unit. GPU malfunction is rarely heard of, however, with an increase in gamers using cheap GPUs bought from third-parties, these errors have become common.
- Bad Windows Installation: This is one of the rare reasons that your game isn’t running properly. A badly installed operating system with outdated or corrupted files will show problems from the early stages of the installation which may go unnoticed. But a high-performance game might push it over the edge.
How To Prevent Cyberpunk 2077 from Crashing on Startup
We have over-viewed all the common reasons which could cause Cyberpunk 2077 to keep crashing on startup. Now let’s look at how we can correct this problem on your PC. Before running any of the following corrections, make sure that system specifications match the minimum game requirements. If they don’t, then your game just can’t run on your PC in its current configurations.
1. Verify File Integrity (on GOG and EPIC games)
Validating all game files is an essential step for every time game crashes come in between your enthusiastic Cyberpunk 2077 experience. One of the best and easiest ways to deal with this situation is to select your gaming platform, be it GOG or Epic Games Launcher, and go through the instructed steps to repair missing and/or corrupted game files. We have laid out the steps to check file integrity on GOG and Epic Game Launcher. Take a look:
On GOG
- Launch the GOG Galaxy platform and choose Cyberpunk 2077 from the Library.
- Tap on the Settings icon next to the Play option.
- Click on Manage installation, and then Verify / Repair.
- Wait for the process to complete and see for yourself whether you can play Cyberpunk 2077 normally now.
On Epic Games Launcher
- Launch the Epic Games Launcher, and go to the Library tab on the left pane.
- Tap on the Cyberpunk 2077 tile and select the icons with three dots next to it.
- Click Verify.
- Test the game once the process finishes.
2. Disable In-Game Overlay
If you have in-game overlays turned on, chances are your game will inevitably crash sometime or the other. Even if you have had a smooth experience with in-game overlays so far, any crash you come across stands a chance to be resolved solely by turning the feature off.
Here’s how to turn the in-game overlay off if you are playing on GOG:
- Launch GOG Galaxy and open the Library.
- Click on the gear icon situated in the bottom-left corner.
- Uncheck the In-Game Overlay option from the pop-up window, and click on Ok.
If you’re playing Cyberpunk 2077 on Steam, here’s how to disable the overlay:
- Right-click on Cyberpunk 2077 from the game list and choose Properties.
- Uncheck Enable the Steam Overlay while in-game.
3. Change The Power Settings
The power setting of your system decides how much power is sent to each module of your motherboard. Regardless of the requirement of your motherboard, these settings cannot be overwritten. If systems requirements and the settings do not match, then your PC will shut down. Following are the steps you can follow to correct this issue.
Step 1. Start the Control Panel. This can be done by typing “Control Panel” in the search bar on the taskbar or by pressing “Windows + R” and writing “Control” and hit enter. Make sure the Icon option in the Control Panel is set to “Small icon”.
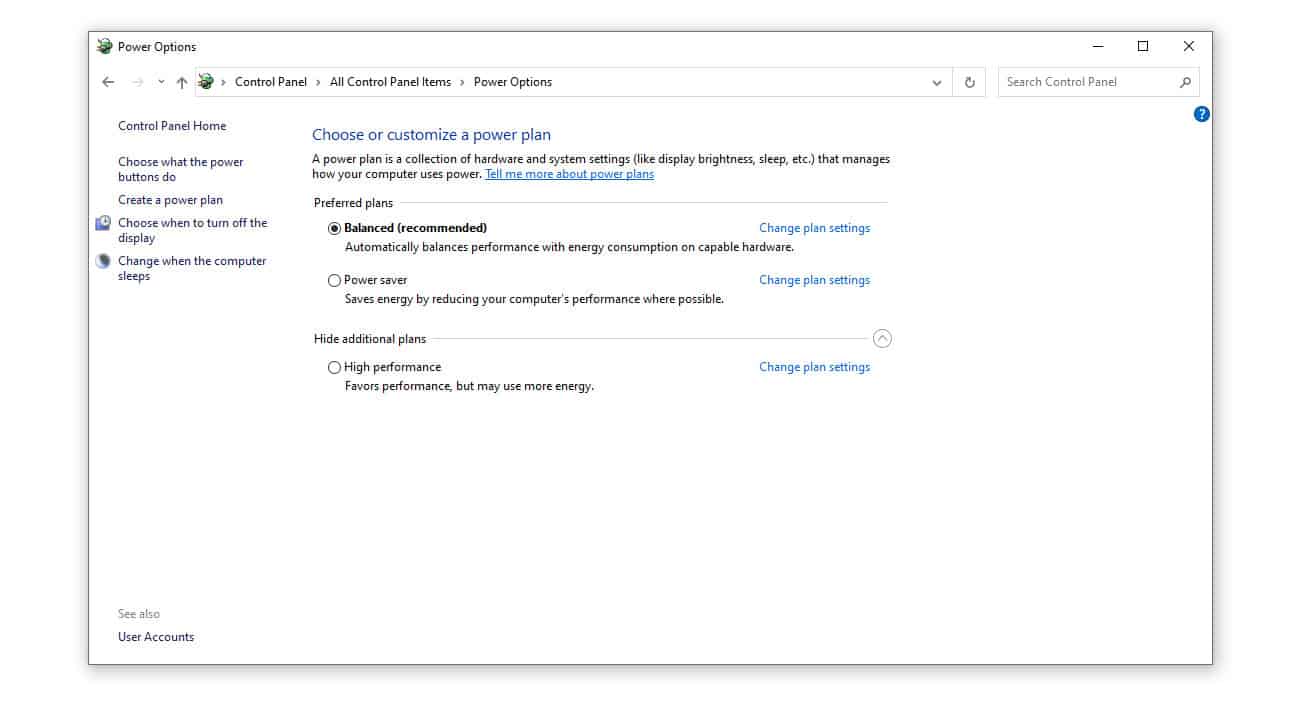
Step 2. In the control panel, find “Power Option”.
Step 3. Within the Power Option, if you have chosen the “Power Saver” mode then you need to change it to “High Performance” or “Balanced”.
Step 4. If any internal changes have been made it any of these options, click on “Change Plan Settings” and select “Restore default settings to this plan”.
Step 5. Save changes and exit. Restart the system and check whether the problem has been resolved
4. Check The GPU
It is very tempting to equip your PC with powerful third-party GPUs like that from NVIDIA and AMD. However, there is a chance that your system is not compatible with them. You can fix this problem by making changes to the device manager.
Step 1. Press “Windows + R” and type “devmgmt.msc”. This will take you to the Device Manager.
Step 2. In Device Manager, click on “Display Adapters”. A drop down with all installed GPUs will show.
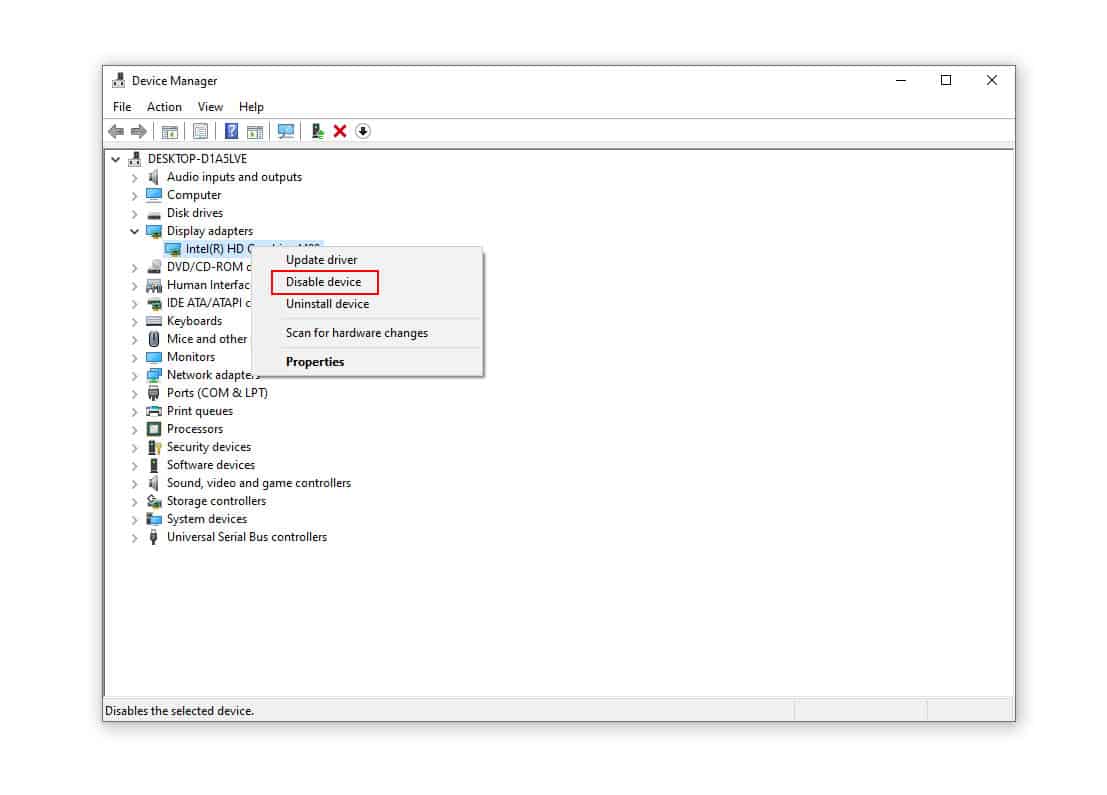
Step 3. Right-click on the problematic GPU and select “Disable Device”.
Step 4. Restart the system and see if the problem continues.
5. Disable Overclocking
Many factors decide how good a gaming PC is. One of those factors is Overclocking. In Overclocking mode, the CPU will run fast computations until it reaches its highest temperature wall. Once this temperature is reached, the CPU reverts to normal speeds. Disabling overclocking could help solve your issue. The only way to do so is to access your BIOS while your system restarts. Also, make sure to remove any computer enhancing software as they tend to ruin system performance.
6. Updating Graphics, Drivers
Keeping drivers updated is necessary for the optimum functionality of your system. As graphic drivers are running whenever you play a game, it is necessary to keep these drives updated. Most of the time these drivers update themselves, but you might have to take things into your own hands. Otherwise you can just visit the graphic card’s official website and find out the latest driver update.
You could also try and lower the graphics of the game to prevent your laptop from getting overheated which can also switch off your laptop. You should try these Cyberpunk PC settings to run the game in the best way possible. Similarly, If you are on the old gen console, you can the graphic settings from our article “How To Improve Cyberpunk Graphics On Consoles?” to enjoy better gameplay.
7. Disable Windows Automatic Restart Feature
Sometimes the issue is the oversensitivity of your system. In that case, you need to disable your systems auto-restart option. Use the following steps:
Step 1. Open “Control Panel” from the Start menu.
Step 2. Click on “System”.
Step 3. In the new control panel, find “Advanced System Settings”.
Step 4. Under the tab, “Advanced”, find Startup and Recovery and click on “Settings”.
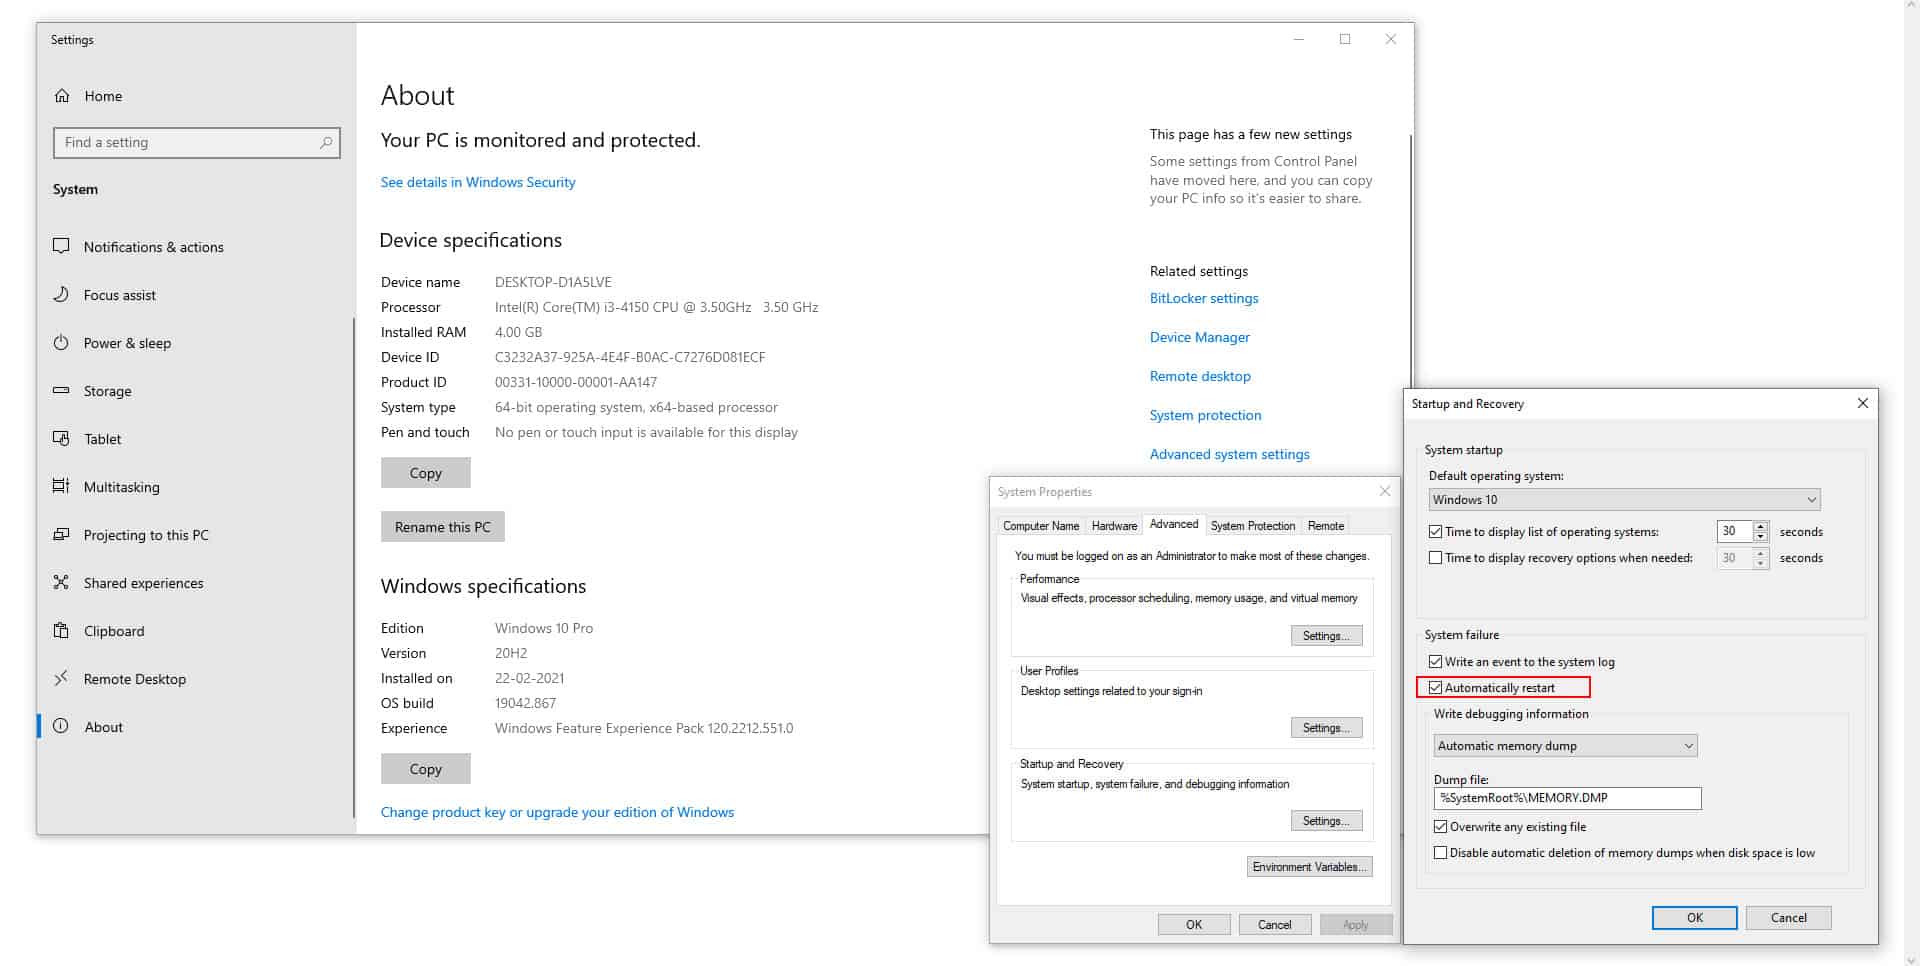
Step 5. In Startup and Recovery, find System Failure and uncheck the box “Automatically Restart”. Press OK.
Step 6. Apply the settings and Restart your PC.
8. Checking Your PSU
PSU stands for Power Supply Unit; the PSU is a very important component in the CPU. It regulates the voltage to different components of the CPU as one may require a higher voltage than another to function. In case your PSU is malfunctioning then restarting the PC is the least of your problems. If not corrected early, it may cause irreparable damage to your system.
You should first get a temporary PSU and run your system. In case the problem is fixed, then you can confirm that PSU is the issue. Also, make sure to replace cable connections from PSU to the electrical outlet.
9. Performing A System Restore
If any recent change was made to the system during the installation of a file or faulty update, then this change could be causing your system to restart. In this case, you will have to carry out a System Restore and this will roll-back your system to settings when this problem wasn’t occurring. Follow the underwritten steps. Make sure to backup and save your work before moving forward.
Step 1. In the search bar on the taskbar type “Restore”. Choose the first option that shows.
Step 2. In the control panel, choose “System Restore” under the tab System Protection.
Step 3. You could either follow the recommended steps and keep clicking “Next”, or customize as per your requirements.
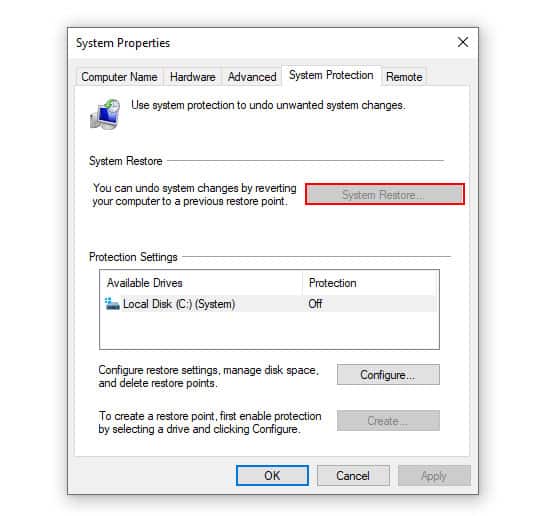
Step 4. Now select a restore point-form list of options given to you.
Step 5. Windows will ask for one last confirmation and continue with the restoration.
10. Check Processor And Heatsink
Your heatsink is responsible for keeping your processor cool. Most commonly if you are facing restart issues while running a game, then it is automatically assumed that overheating is the issue. While checking the heatsink go-ahead and check that the entire system is getting the right amount of cooling. Make sure fans are running at optimum speeds and air intakes are unobstructed.
11. Reinstall Cyberpunk 2077
Often, if your game has constantly been crashing, there’s nothing that a fresh install cannot fix. Try to reinstall a fresh copy of the game and see if the persistent issues become a thing of the past. Your previous game copy might have been corrupted somehow, resulting in frequent crashes. A new installation can often take care of that. Ensure you delete all the game files remaining from the previous folder before installing the new one.
Conclusion
Cyberpunk 2077 is one of the best games to come out in 2020. Though it has been known to cause the restart error, we should not hold this against them as many games of this size and specifications are known for this problem. One of the above-mentioned steps is bound to get you back to gaming in no time.


